
You want that dramatic, floor-to-ceiling look you keep seeing in design photos, but you’re not sure what it actually takes to get there. Fabric choice, mounting height, hardware, fullness — it all matters more than it seems. Get it wrong, and your windows look cluttered instead of grand. This guide breaks down everything you need to know about floor to ceiling curtains, from style and sizing to how they function in a real room, so your windows finally get the fit they deserve.
What Floor to Ceiling Curtains Actually Are (and Why Height Matters)
Standard-Length vs. Floor to Ceiling Panels
Most people picture curtains starting at the top of a window frame. That’s standard length. It’s fine, but it’s not what we’re talking about here. Floor to ceiling drapery starts just below the ceiling line or crown molding, well above the window itself, and runs all the way down to the floor. The frame becomes almost irrelevant. You’re treating the whole wall, not just the glass cut into it. For a deeper breakdown of how this works in practice, it helps to read a guide to floor to ceiling curtains before you start shopping fabric.
Why bother with the extra height? It tricks the eye. A panel that climbs toward the ceiling draws the gaze upward, and that makes the wall look taller than it is. Standard panels stop short. That chops the wall into two zones: window and empty space above it. Floor to ceiling panels erase that break entirely. A room with 8-foot ceilings can read as noticeably loftier just from where the rod sits, no construction required.
The math is simple but easy to ignore. Mount the rod 4 to 6 inches below the ceiling instead of 4 inches above the window frame, and you’ve added a foot or more of vertical fabric. That one change shifts the whole room’s proportions. Furniture looks lower, ceilings look higher, and the window itself almost disappears into the composition. It’s a small adjustment with an outsized visual payoff.
Now for the mistakes, because there are two big ones. First: hanging panels too low, stopping at the window frame and calling it done. That wastes the entire point of the style. Second, and more common: hanging panels too narrow for the window width. Curtains should extend well past the frame on each side, often 8 to 12 inches, so they don’t look cramped when drawn open. Skimp on width and even perfectly high panels will look stingy and undersized.
Design Benefits: Light Control, Privacy, and Room Proportion
Layering Drapery With Shades for Day-to-Night Flexibility
A room with twelve-foot ceilings can feel more like a lobby than a living room. That’s the trouble with height: it reads cold unless something softens it. Hanging panels from just below the crown molding all the way to the floor draws the eye vertically and breaks up all that bare wall. Even a plain linen panel does the job here, and if you want a deeper dive into weights and weaves, linen curtains are a solid place to start.
Pairing a sheer panel with an opaque one gives you a dimmer switch for light instead of an on-off button. Close the sheer during the day and you get soft, diffused brightness with privacy from the street. Draw the opaque layer at night and the room goes dark and private in seconds. If you’re unfamiliar with how sheers behave across different fabric weights, a sheer curtains guide is worth reading before you buy anything.
Color matching matters more than people expect. Pulling one thread color from an existing roman shade or a woven wood shade and echoing it in the drapery fabric ties a whole wall together instead of looking like two unrelated purchases. Many homeowners skip this step. It shows.
In open-concept homes, full-height panels can also act as a soft room divider. Hung from a ceiling track between a dining area and a living space, they close off a zone for a dinner party, then pull back to open the floor plan again. It’s a cheap, reversible way to add structure without a wall.

Comparing Floor to Ceiling Curtains to Other Window Treatments
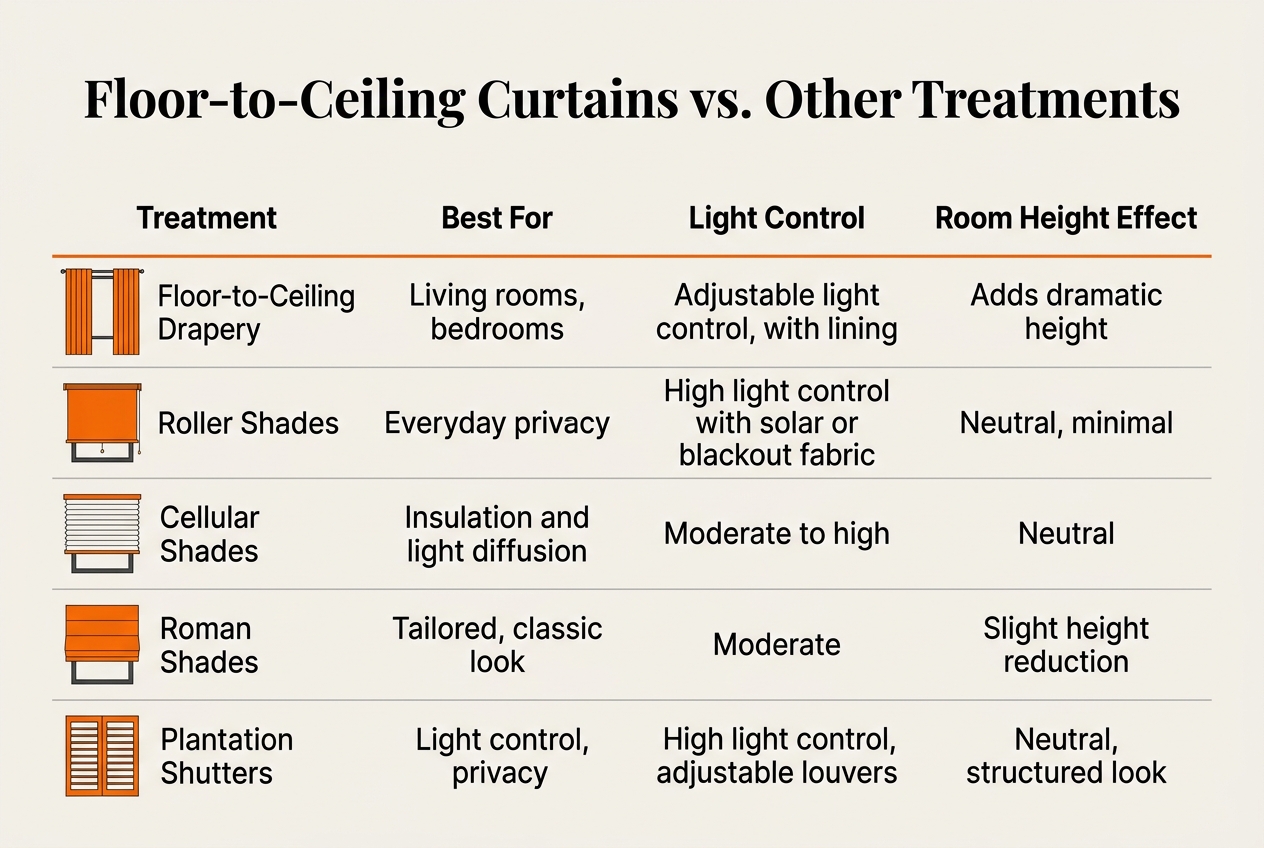
Drapery isn’t the only answer for a window, and it shouldn’t be. Each treatment handles light, heat, and privacy a little differently, and knowing the tradeoffs helps you pick the right combination instead of guessing.
| Treatment | Light Control | Insulation Value | Privacy Level | Typical Cost Tier |
|---|---|---|---|---|
| Custom drapery | Good with lined panels, soft edges | Moderate; depends on fabric weight | Moderate unless fully closed | $$$-$$$$ |
| Cellular shades | Excellent, especially blackout versions | Best in class, honeycomb air pockets | High | $$-$$$ |
| Roller shades | Good, varies by opacity | Low to moderate | Moderate to high | $-$$ |
| Plantation shutters | Excellent, adjustable louvers | Moderate, depends on frame fit | High | $$$$ |
Here’s the blunt truth: drapery wins on softness and drama, not on sealing out a cold window. If your room still feels drafty or sun-bleached after hanging gorgeous panels, that’s not a drapery failure. It’s a job for a second layer. Pairing floor-length curtains with cellular shades behind them gives you the insulation and daytime privacy shades provide, plus the finished look curtains deliver at night. This also solves a common complaint: people assume thicker fabric alone will quiet a busy street, but privacy curtains paired with a cellular or roman shade do more real work together than fabric alone ever could. Shutters, meanwhile, handle light and privacy on their own but skip the soft texture a room often needs. There’s no single “best” option here. The smart move is layering, treating drapery as the finishing touch rather than the whole solution, and letting shades or shutters carry the functional load underneath.
Solving Common Household Problems With the Right Treatment
Noise and Temperature
Traffic noise, barking dogs, loud neighbors. Big windows let a surprising amount of it in. Heavier drapery fabrics, especially a lined velvet or a tightly woven cotton blend, absorb sound instead of letting it bounce around the room. Layering drapery over cellular shades adds another barrier, since the honeycomb pockets trap air and muffle sound at the same time.
Rooms with large windows also swing in temperature fast, cold in winter, stuffy by afternoon in summer. Before anyone jumps to bigger fixes, insulating cellular shades are worth trying first. Reading your guide to energy efficient window coverings is a smart place to start if you’re not sure which cell size or fabric density actually makes a difference. A few points worth knowing:
- Double-cell shades trap two layers of insulating air instead of one, which matters most on north-facing rooms.
- Side channels and tight headrails reduce the gaps where drafts sneak through around the shade itself.
- Cordless lift systems let you raise and lower shades daily without wrestling a tangled cord every time.
- Pairing cellular shades with drapery panels adds a second thermal layer for rooms that still feel drafty.
- Single-pane or failing windows have limits no shade can fully solve, and that’s a different project entirely.
UV and Safety
Sun fades hardwood floors and bleaches furniture faster than most people expect. Light-filtering shades cut UV exposure while still letting daylight into the room, and unlike film, they can be raised, lowered, or swapped out as your taste changes. Woven shades and solar roller shades both do this well, with the added bonus of softening glare on a TV or laptop screen in the afternoon.
Cords are the other quiet hazard, especially with kids or pets around. Cordless lifts and PowerView motorized options remove the dangling cord entirely, which settles the safety question without turning blinds into something they’re not. Cordless and motorized shades solve the real problem directly. A quick consultation can also walk you through whether window treatments increase home value, which is a fair question if you’re weighing the investment against other upgrades. Either way, the goal is the same: comfort, protection, and one less thing to worry about.

Choosing Fabric, Hardware, and Hanging Style
Before you pick a single panel, think about what the fabric needs to do. Sheer fabric softens light and blurs the view in without blocking it, which is great for a living room that wants glow, not privacy. Light-filtering drapery sits in the middle: it dims glare, keeps some daylight, and still lets the room breathe. Blackout-style drapery is the heavy hitter, built for bedrooms or media rooms where you want the sun gone, full stop. If small windows are part of your layout, it’s worth reading up on curtains for small windows before you commit to a fabric weight that might overwhelm a narrow frame.
Hardware matters just as much as fabric. Ceiling-mounted tracks pull the eye upward and make ceilings feel taller, which is the whole point of a floor-to-ceiling look. Wall-mounted rods are easier to install and work fine when your ceiling has crown molding, recessed lighting, or structural quirks that make ceiling mounting a hassle.
Pleat Styles and Fullness
The pleat you choose changes how the fabric falls, how much fullness it shows, and how formal the whole window looks. This isn’t a small decision — it affects yardage, cost, and the finished drop.
- Pinch pleat gathers fabric into tailored clusters at the top, giving a traditional, structured look that pairs well with heavier drapery weights.
- Ripple fold creates soft, even waves across the whole width, a cleaner and more modern style that glides smoothly on a track.
- Grommet top uses metal rings the rod passes through, producing relaxed, uniform folds with minimal hardware showing.
- Fullness ratio, usually two to two-and-a-half times the window width, determines whether panels look skimpy or rich and layered.
- Arched or angled windows often need a fixed decorative panel or a custom-shaped rod, since standard track hardware won’t follow a curve.
- Oversized windows may require multiple panels joined on a single track, plus reinforced mounting since the extra fabric weight adds real strain.
For specialty shapes, a consultation that measures the actual window, not a generic size, is the only reliable way to get hardware and pleat style to match.
Step-by-Step: Measuring and Installing for a Clean Floor-to-Ceiling Look
Getting the hang right is mostly math, not magic. Measure from the ceiling or the top of the crown molding straight down to the floor, then subtract about half an inch so the hem clears carpet or hardwood without dragging. Rod placement matters just as much. Mount it anywhere from 4 to 10 inches beyond the window frame on each side, depending on room width, so the panels can stack fully off the glass and actually block light when closed.
Here’s a quick reference for the sequence most installers follow, and where mistakes tend to creep in.
| Step | What Happens | Common Mistake |
|---|---|---|
| 1. Ceiling/floor measure | Record height at both ends of the window, not just the center | Assuming walls are level |
| 2. Rod width calculation | Add clearance beyond the frame for full stacking | Mounting rod inside the frame |
| 3. Bracket mounting | Anchor into studs or use drywall anchors rated for weight | Using drywall screws alone |
| 4. Layering check | Confirm clearance for blinds or shades beneath | Rod too shallow, panels hit the shade |
| 5. Final hem adjust | Trim panels on-site after hanging | Ordering by guess instead of on-wall measure |
That bracket row is where DIY projects often stall, since a heavy drapery panel pulls loose from weak anchors within months. A professional measuring visit during a free consultation catches these issues before fabric gets cut, which matters because custom drapery can’t be shortened twice. If you’re also running powered shades, it helps to understand how automated blinds compare to automated shades before deciding what sits behind the curtain layer. When combining treatments, install the inner shade or blind first, mount the drapery rod last, and leave enough depth between the two so cords and panels don’t tangle.
When Curtains Alone Aren’t the Right Fix
Drafts, Heat, and Storm Protection Boundaries
Not every cold spot in a room is a fabric problem. If you’ve got a draft that won’t quit, no matter how heavy the drapery or how tight the seal along the rod, the window itself is likely the culprit. Single-pane glass, warped frames, failed weatherstripping — these are structural issues. A window contractor needs to look at that, not a drapery consultant. Cellular shades can help trap air and cut the chill as a lower-cost first move, but they won’t fix a window that’s simply worn out.
Heat is trickier, because where you stop it matters. Sun hitting the glass has already won half the battle by the time it reaches your living room. Exterior awnings block that heat before it ever touches the window, and that’s genuinely outside the scope of interior treatments. What you can do indoors is nearly as effective for comfort: solar roller shades or woven wood shades cut glare and knock down heat gain significantly, even if they’re not blocking rays at the source.
Storms are where the line gets firm. Interior plantation shutters look sharp and manage light beautifully, but they’re not wind-rated or built for impact. If you’re after real storm protection or home security, that’s a licensed exterior contractor’s job, full stop. Confusing interior shutters with storm shutters is a mistake you don’t want to make during hurricane season.
Fabric Refreshing and Hardware Repair
Years of dust, pet hair, and sun exposure take a toll on drapery fabric. If your panels need deep cleaning or odor removal, that calls for a dedicated textile cleaner who handles fabric care professionally. Trying to spot-clean floor to ceiling panels yourself often leaves water marks or uneven fading, so it’s worth leaving to someone who does it for a living. For comparing when it makes more sense to clean versus replace, blinds vs curtains choosing the right window treatment is a useful starting point.
Hardware is a different story, and a more solvable one. Loose brackets, a track that won’t glide, a broken tilt wand on a blind — those are mechanical problems, not fabric ones. That kind of repair is well within reach for most window treatment professionals. Don’t toss a whole treatment because of one snapped cord or a sagging rod. Half the time, it’s a small fix.
Getting a Custom Floor to Ceiling Curtain Plan for Your Home
A free in-home design consultation isn’t a sales pitch dressed up as a visit. It’s a working session. A designer brings fabric swatches so you can see how a linen or velvet actually behaves in your light, not on a screen. Hardware samples come along too, so you can feel the weight of a rod and compare traverse tracks to decorative poles before committing. Then comes the measuring, which is where most DIY plans go sideways. Ceiling height, window width, and return depth all get recorded on-site, because accurate numbers are what separate a crisp, floor-skimming panel from one that pools awkwardly or hikes up six inches short.
Most homes aren’t starting from a blank slate. Maybe you’ve already got wooden blinds for privacy, or cellular shades doing quiet work on energy bills. Layering drapery on top isn’t about replacing those treatments. It’s about coordinating color, texture, and hardware finish so the whole window reads as one intentional design instead of two unrelated ideas stacked together. The same goes for shutters: panels can frame them without fighting for visual space, provided the designer accounts for stack depth during the consultation. Reviewing guidance on choosing and installing custom draperies beforehand gives you a useful head start on the conversation.
This kind of planning happens throughout Bergen County, in Fort Lee, Edgewater, Englewood, Tenafly, Ridgewood, and Franklin Lakes homes alike, where ceiling heights and window styles vary block to block. Seasonal promotions on select product lines often make it a smart time to schedule a showroom visit or request a home consultation. Call (201) 302-9111 and get it on the calendar. Waiting rarely saves money.
Before deciding anything, it helps to be honest about what’s actually bothering you about the room—is it the glare and heat coming through the glass, the draft on a cold morning, or simply wanting a cleaner look at the window—since each points toward a different fix and not every one of them is a window-covering problem. It’s worth asking whether you’re trying to solve something permanent at the glass itself versus something adjustable day to day, because those two paths rarely overlap and mixing them up tends to mean paying twice. A short conversation with someone who can look at the actual window and talk through light, privacy, and budget usually clarifies more than another round of searching on your own.